What happened to the RCI event?

Blogging event Regional Cuisines of India (RCI) was started by Lakshmi of Veggie Cuisine, to celebrate the rich and diverse cuisines of India, and was hosted by a different blogger each month in 2007, 2008 and for some of the 2009. It was one of my favourite blogging events, and the one through which I learnt a lot about the wonderful diversity of the food in India. Unfortunately, the event hasn’t been held for many months now. Does anyone know anything about it? I’d be sad to see it go. We’ve got many many more cuisines to explore! Let’s get RCI back!

RCI Hyderabad: Murgh/Gosht Tamatar (Lamb/Chicken with tomatoes)

Regional Cuisines of India (RCI) is the blogging event started by Lakshmi of Veggie Cuisine, to celebrate the rich and diverse cuisines of India. It’s been a while since I had time to take part in what is probably my favourite event. This month we’re exploring the cuisine of the princely state of Hyderabad. Our host this month is Mona, from Zaiqa.

I know I should be making a byriani, the celebrated dish of the Royal Hyderabad, for this event. But the time is a little tight, so my second entry for this event is a simple, light and aromatic lamb curry with tomatoes, coriander and curry leaves. I made it twice in the last two weeks, the second  time with chicken (see photo). I think I prefer it with lamb, though. It goes really well with Hyderabadi Coriander and Mint Chutney.


Hyderabadi Lamb with

Tomatoes


(Timatar Gosht)


SOURCE: Madhur Jaffrey’s ‘The Ultimate Curry Bible’

PREPARATION TIME:10 – 15 min

COOKING TIME: 1 – 1.5 h 

CUISINE: Indian – Hyderabadi

SERVES: 2

Ingredients:

500 g boneless lamb, cubed

1 tbsp fresh ginger, peeled and finely grated

6 cloves of garlic, peel and crushed

1 1/2 tsp ground cumin

1/2 tsp turmeric

1/2 tsp salt (or according to taste)

3 desert spoons of ghee

210 g chopped yellow onion

1 can tomatoes (or 450 g fresh tomatoes, peeled and crushed)

6 green chilies, chopped

15 – 20 fresh curry leaves

2 – 3 tbsp fresh coriander, chopped


Method:

1. Marinate the meat with garlic, ginger, cumin, turmeric and some salt for 30 minutes or longer.

2. Meanwhile, prepare the onions. Then, heat the oil to high medium heat. When hot (it sizzles when you put a wooden spoon in it), add onions and fry until brown.

3. Add the meat with its marinade and stir-fry for a minute or two. Cover, reduce heat to medium-low and cook in its juices for another 8 – 10 min. Keep an eye on the pot, so the meat doesn’t burn. If it starts sticking badly, add a little water to the pan and stir.

4. Now add the tomatoes, the chilies, the curry leaves and coriander and bring to simmer. Cover and reduce heat to low, then cook for another 30 – 40 min or until the meat is done, and the tomatoes turned into a dark, luscious, thick sauce. Serve with rice or roti.


Notes

It’s worth seeking out fresh curry leaves (though use dried curry leaves, if you have to), because they make a difference to the flavour.

I might try this with fresh tomatoes next time.

The chilies are boiled in the sauce and therefore very very mild. I loved biting into them, though. I think I’ll try and add a few more next time, to add more heat to the dish.   


IMG_0090

  Murgh Timatar – For the chicken version (pictured above), replace the lamb with the same amount of chicken. I used chicken thigh.


RCI Hyderabad: Hyderabadi Mint & Coriander Chutney

It’s been a while since I had time to take part in what is probably my favourite event – Regional Cuisines of India (RCI), the blogging event started by Lakshmi of Veggie Cuisine, to celebrate the rich and diverse cuisines of India. This month I’m back, and exploring the cuisine of the princely state of Hyderabad. Our host this month is Mona, from Zaiqa.

Mona has a whole host of mouthwatering Hyderabadi recipes on her blog, and many of them caught my eye. One of them inspired me to create this lovely chutney, based on a treasured family recipe that Mona’s grandma used to make. I kept the ingredients the same as Mona’s, apart from substituting Thai red chilies for green chilies only. I also adjusted the quantities of tamarind to suit our taste, and the fact that I was using concentrate: I reduced it, otherwise it would have killed off all the other flavours. Also, my curry leaves were tiny, so I added a few more to give them a more prominent role in the chutney. All of this really shows how it’s necessary to work with the ingredients at hand, taste them to get to know them, and adjust the quantities accordingly.


Coriander and Mint Chutney 

(Hara Dhaniya aur Pudine Ki Chutney)


SOURCE: adapted from Mona’s recipe at Zaiqa

PREPARATION TIME:10 – 15 min

COOKING TIME: 2 – 3 min

CUISINE: Indian – Hyderabadi

SERVES: 2


Ingredients:

1/4 – 1/2 cup desiccated coconut

1 tbsp sesame seeds

a little groundnut oil

1/2 cup fresh coriander leaves, washed and dried, roughly chopped along with the tender stems

1/2 cup fresh mint leaves – 1 cup, washed and dried on paper towels, roughly chopped, only leaves

4 cloves of garlic, roughly chopped

6 green finger chilies, washed and roughly chopped (or fewer, according to taste)

8 – 10 fresh curry leaves

1/2 tsp tamarind concentrate

Salt to taste


Method:

  • Heat the oil on medium high heat, and as it warms up, add the shredded coconut and the sesame seeds, and roast them both together till light brown and aromatic. Let it cool. Keep aside.
  • Put the coriander leaves, mint leaves, garlic pods, red and green chillies, curry leaves, tamarind pulp, sesame seeds, shredded coconut and salt in a blender, and blend it till nice and smooth. You can add about half cup of water to aid in the blending if needed.


Notes

Tamarind is very strong-tasting and it can overpower other flavours. It’s best to add it cautiously.

The chutney keeps well in the fridge for up to a week. However, with time, all flavours fade, except for (you’ll guess) tamarind. You’ve been warned!

I served this with a fragrant and simple Hyderabadi tomato-based chicken curry (Hyderabadi Murgh Tamatar), which worked really well and perked up the dish considerably.


Verdict

Fragrant and tasty chutney, with vibrant, clean spicy notes of the green chilies. Enjoyed it, & will make again!

RCI: Bengali Red Dal

Blogging event Regional Cuisines of India (RCI) was started by Lakshmi of Veggie Cuisine, to celebrate the rich and diverse cuisines of India, and is hosted by a different blogger each month. I think this event is a fantastic idea, because not only does it encourage us to explore the many varieties of regional Indian food, but the round-ups also provide excellent resources of information and recipes! For this reason, I’ve decided to dedicate a page to it that contains round-ups of past events, and RCIs that are yet to come, so that I can find it and refer to it easily!Photobucket

This month, we are exploring the cuisine of West Bengal, and our host is Sandeepa from Bong Mom’s Cookbook.

Food is very important to Bengalis. Traditional feasts are carefully structured rituals consisting of numerous dishes, carefully and laboriously prepared, with different structures and  tastes playing an important part of the meal. Such feasts are always finished off with a sweat, usually based on milk and cream, for which Bengal is famous all over India. Fish (both freshwater and sea fish) and rice are the main staples of this coastal region nurtured by the Ganges river, and a delicate mixture of sweet and spicy flavours is characteristic of Bengali dishes. Mustard oil is the preferred cooking medium, and mustard seeds and greens are also used. Mustard is indeed one of the 5 ingredients in Panch Phoron, a typically Bengali mix of equal amounts of 5 spices: fennel (saunf), nigella seeds (kalonji), black mustard seeds, cumin seeds (jeera) and fenugreek seeds (methi). Coconuts and ginger are also widely used in Bengali cooking, and a touch of garam masala is often added to the food to enhance its flavours. Other characteristic ingredients include red lentils (massoor dal), moong dal (moong lentils), poppy seed paste (posto), mustard paste and mangoes.

To find out more about Bengali cuisine, please check out this interesting and informative article, as well as the Wikipedia entry on Bengali cuisine, which describes the courses in a typical Bengali meal. For a wealth of mouth-watering Bengali recipes, do check out these two fantastic blogs: Quick Indian Cooking & Bong Mom’s Cookbook

1952WestBengal

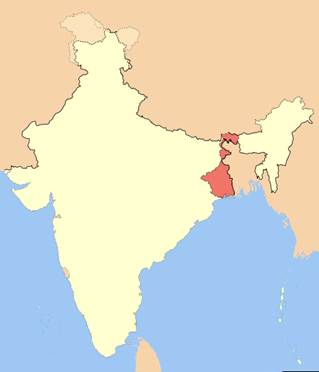
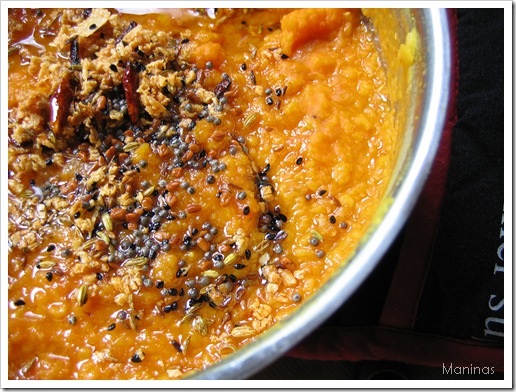
West Bengal – Wikipedia Commons As my entry, I’ve chosen this gorgeous Bengali dal. I really wanted to make this recipe from Sangeeta’s blog, but then felt a little silly submitting her her own recipe, so I’ve chosen this one, which is similar, and yet different. This recipe features red lentils, or masoor dal, which seems to be a favourite Bengali dal, judging from the recipes I found featuring this pretty little lentil. Another important characteristics is the use of Panch Phoron. The recipe has three basic steps: the lentils are cooked with turmeric and green chili, and then seasoned with onion, tomato and ginger paste; this is then seasoned with dried chilies, panch phoron and garlic tadka.
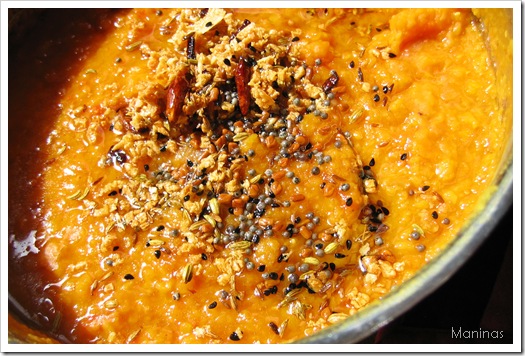
 IMG_8532 

Bengali Red Dal


SOURCE: adapted from this recipe from Rumela’s web

PREPARATION TIME: 5 min

COOKING TIME: 30 – 40 min

CUISINE: Indian – Bengali

SERVES: 3 – 4Ingredients:

1 1/2 cup red lentils
3 1/2 cup water
3 green finger chilies (but see note)
1/2 tsp turmeric, or more to taste
1/2 tsp salt, or to taste
4 tbsp ghee, butter or vegetable oil
1 cup minced
onions (1 medium to large onion)
1 cup chopped tomatoes
1 tbsp grated fresh ginger
2 tbsp ghee or vegetable oil
1 tsp panch phoron mix
4 dried small red chilies
3 cloves
garlic

1/2 tsp sugar (optional)

Method

1. Rinse lentils well, add water, chilies, turmeric and salt. Bring carefully to boil and cook over low to medium heat, partially covered, for 25 minutes. Cover and cook another 10 minutes. Adjust salt.

You will see the lentils go through various stages during cooking. They will first disintegrate and look like little pieces of peel. At this point, they will still taste slightly raw, and have a particular taste that I associate with raw pulses. After some time, they will disintegrate further into a velvety mush, with an addictive and comforting flavour. I find this irresistible!

2. While lentils are cooking, heat the oil or ghee in a pan. The oil is hot engouh when it starts sizzling when you insert the wooden spoon. Then add the onions and cook until they are golden brown, stirring constantly.

3. Add ginger and stir for 5 seconds. It will stick a little, but don’t worry. You’ll get it off when you add the tomatoes.  Add the tomatoes and continue cooking until the tomatoes decompose into a delicious and fragrant mush, and the oil or ghee starts oozing from the mixture.  Stir so that tomato mixture doesn’t stick. Turn heat to low if necessary.

4. Scrape out the tomato mixture into the lentils and stir it in. Stir in the sugar if using it. Let lentils sit while you make the spiced oil.

5. Do a quick rinse of the frying pan, without soap, and dry thoroughly, or use another smaller pan if you wish. Add the remaining 2 tbsp of ghee or oil and heat over medium high heat. I recommend using ghee at this stage, for superior flavour.

6. When it is hot, add panch phoron mix and heat until the mustard seeds begin to pop, which will take about 15 – 20 seconds. Mind the splattering! Then, add red chilies and fry for another 15 seconds, until they turn a little darker. Turn off heat and add the crushed garlic and let sizzle for about 30 seconds. Stir this mixture into the lentil/tomato mixture and cover the pan quickly to capture the aromas. Leave for a few minutes, and serve with rice. Adjust salt.

IMG_8549


Notes

We didn’t think it was hot enough. Next time, I’ll add either more green chilies, or more dried red chilies at the end. I’ll also try it with or without sugar.

At one point, I thought I used too much turmeric, but I actually liked it the way it was. Red lentils, turmeric and ginger are a fantastic combination!


Verdict

This dal was absolutely gorgeous! We simply loved it! The husband almost liked the pan clean! Yeap, we shall be making this again!

The flavours were fantastic, and came in different layers, corresponding to the three cooking stages (lentils, tomato mixture, tadka). As well as tasting great, it had this amazing orange hue that I really loved, and the house was perfumed by the beautiful aroma of panch phoron.

IMG_8546

__________________________________________________________


Chana Masala & Rajma – From Scratch!

As promised, here is the recipe for my chana masala (chickpeas curry) and rajma (red kidney beans), made entirely from scratch!

As I said, I was loosely inspired by the ingredients list on the MDH chana masala box (I’ve long stopped using it though). The basis of the dish is made of browned red onions, garlic, ginger and green chili, spiced with a combination of whole and powdered spices. I’ve read somewhere that the difference between whole and powdered spices is like the difference between high and low notes: think high notes when using whole, and low when using powdered spices. Of course, quantities matter, too. The coriander stand out a little, as I’ve added 1 1/2 tsp of it. That’s how I like it. The dish is finished off with a sprinkle of garam masala to round the flavours, and some amchoor to add the sour tones that I’m so addicted to, and to heighten the other flavours.

(The photos are of rajma only, though!

Rajma

Rajma – Punjabi Red Kidney Bean curry


Spice Tip – Coriander powder

Coriander powder does not burn easily. You can add it first among the powdered spices.

Techniques – Slicing onions

This is how I like slicing my onions. They look gorgeous when cooking, and cook rather evenly; another advantage is that I find it quicker than chopping onions as it takes no time to do it. Also, it does need a chopping board!

Take the sharpest small knife that you’ve got. Of course, you can use a bigger one, but it’s easier to use a small one. Also, the sharper, the better! Peel the onion, and cut it half, removing the hard end at the top where the little moustache used to be. Now, start slicing the onion thinly, creating thin semicircles of onion rings. That’s it!

Techniques – FRYING ONIONS to make Indian food

See this web page: Cooking Indian: How to fry onions.

Rajma

Chana Masala Perfected


SOURCE: ingredients loosely based on MDH chana masala box

PREPARATION TIME: 5 min

COOKING TIME: 45 min

CUISINE: North Indian – Punjabi

SERVES: 2 (as a main, 3 – 4 as a part of an Indian meal)


ingredients

2 medium red onions, sliced

1 1/2 tbsp ghee


2 cloves of garlic, chopped

3 – 4 cm ginger, peeled and chopped

3 – 4 green chilies


1 bay leaf

3/4 tsp cumin seeds


2 green cardamoms, slightly crushed

a pinch of fenugreek seeds (about 1/2 tsp)

4 – 5 cm cassia bark


1 1/2 tsp coriander

1/2 tsp paprika

1/2 – 3/4 tsp turmeric

1/2 tsp cumin

3/4 tsp chili powder


1/2 can tomatoes

a pinch of sugar (optional; I use it to tame the sourness of the tomato)


1 can chickpeas, or the equivalent amount of dried, soaked and cooked chickpeas


1/2 tsp garam masala

1/2 tsp amchoor (dried mango powder)

1 tbsp fresh coriander leaves, chopped


method 

1. Heat the ghee to high medium heat, and add bay leat and cumin to it. Fry the onions, until they start to brown, following  the instructions here. (This is important; please take some time to read the instructions.)

2. When the onions start turning dark brown/purple, add garlic, ginger and chilies. Now add cardamoms, fenugreek and cassia bark. Fry further until the onions are dark brown, taking care not to burn them.

3. Now it’s time to add the powdered spices: add the coriander first and fry for a few seconds, then add the paprika, turmeric, cumin and chili. Fry for another 10 – 15 seconds.

4. Stir in the tomatoes and a pinch of sugar (optional). Cook until the mixture is thickened, preferably until the oil starts oozing at the top, which normally takes 10 – 15 min. This will  give it the best flavour.

5. Add the chickpeas, and cook for another 10 min.

6. Just before serving, stir in the garam masala, amchoor and coriander leaves. Serve with rice. Enjoy!


Verdict

I think I can now throw the MDH masala away! 😀 This is so much better! Especially when made with dried and soaked chickpeas, whose flavour is absolutely superior to the canned ones!


To Make Rajma

 Use the same quantity of rajma (red kidney beans) instead of the chickpeas.

IMG_8432-1

___________________________________________________________

Others’ chana masala recipes: Nabeela’s Chana Masala without the shop bought spice mixChana masala from Lisa’s KitchenHow to make your own chana masala powderMahanandi’s Chana MasalaMeena’s Chana Masala, and a lesson on legumesAnother Meena’s Chana Masala, garnished with a funny storyBarbara’s Chana Masala Sailu’s Chole Masala with PuriAnita’s Punjabi Chhole_____________________________________________________

Other recipes with chick peas at Maninas: My version of Catalan chick peas with tomatoes and almonds . VThis is a must-try, with its delicious flavours of saffron, garlic, tomatoes, almonds and coriander!My Moroccan-inspired chickpeas  VChana Masala for RCI Punjab ______________________________________________________


  • Enter your email address to follow this blog and receive notifications of new posts by email.

    Join 156 other subscribers
  • Recent Posts

  • Recent Comments

    Maninas on For the winter blues: Sri Lank…
    Maninas on Rain and lunch in Harringay,…
    Drita on Andrea’s Gorgeous Tarka…
    Peggy D on Dalmatian Chard with garlic an…
    samudramarya on For the winter blues: Sri Lank…
    loki on Stuffed Peppers OR Punjene…
    HW on Rain and lunch in Harringay,…
  • Categories

  • Top Posts & Pages

  • Archives

  • Instagram

    No Instagram images were found.

  • Flickr Photos